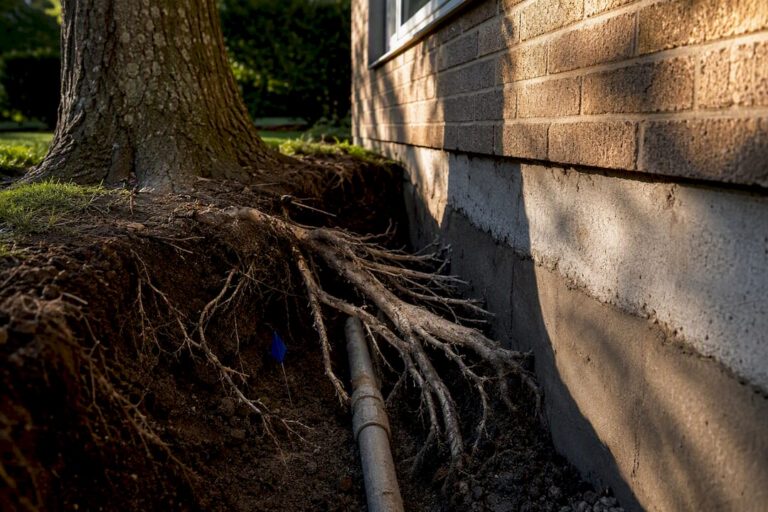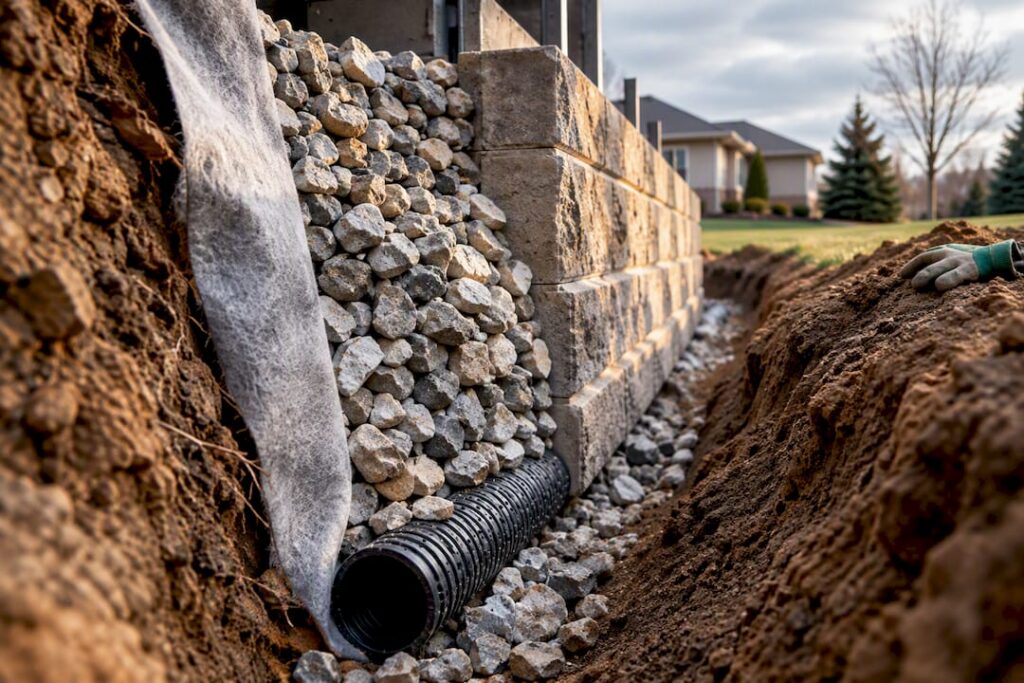
The correct drainage assembly is clean, angular stone backfill at least 12 inches deep, wrapped in nonwoven filter fabric, with a 4-inch perforated drain pipe bedded at the base and pitched to an outlet. Add weep holes on shorter walls for backup relief. This applies to most walls that hold back soil, especially anything 4 feet or taller, sites with clay soil, or spots that collect concentrated runoff. It matches what engineers and installation manuals both recommend, and skipping it is the single most common reason retaining walls fail early.
TL;DR:
- Proper drainage involves a minimum of 12 inches of angular crushed stone backfill, a nonwoven fabric, and a 4-inch perforated pipe pitched to an outlet.
- Walls taller than 3 to 4 feet, built on clay soil, or with nearby runoff sources require a full pipe and gravel drainage system to prevent failure.
- Regular maintenance includes checking outlet flow after storms, clearing weep holes, and inspecting for signs of bulging or cracking to catch issues early.
- Retrofitting drainage into existing walls is feasible for minor problems using weep holes or shallow French drains but often requires professional excavation for full pipe systems.
- Site conditions, climate patterns, and proper installation are critical factors for effective drainage, and mistakes like burying outlets or using insufficient stone depth are common causes of failure.
Table of Contents
- Why Retaining Wall Drainage Prevents Bulging and Failure
- The Core Parts of Every Drainage System
- Materials, Tools, and Sizing for Your Project
- How to Install Drainage Behind a New Retaining Wall
- Retrofitting Drainage Into an Existing Retaining Wall
- Common Drainage Mistakes and a Maintenance Checklist
- Field Notes From Ivan’s Landscaping
- How to Inspect and Monitor Your Drainage System Over Time
- How Rainfall Patterns and Climate Shape Your Drainage Design
- Why Drainage and Wall Structure Have to Be Designed Together
- Managing Erosion and Sediment Around Your Retaining Wall
- When to Handle It Yourself and When to Call a Pro
- How Ivan’s Landscaping Handles Drainage and Retaining Wall Projects
- Sources
- FAQ
Why Retaining Wall Drainage Prevents Bulging and Failure
Water is heavy, and soil that holds water is heavier still. A cubic foot of water weighs about 62.4 pounds, and when that water gets trapped behind a retaining wall instead of draining away, it pushes outward on the wall face with what engineers call hydrostatic pressure. That pressure builds with depth, so a wall holding back 4 feet of saturated soil is fighting a far bigger load than one holding back 4 feet of dry, well-drained soil.
Statistic Callout: Saturated clay soil can weigh significantly more than the same soil dry, and that added weight applies constant lateral force against the back of the wall. Over months of freeze-thaw cycles and repeated rain, that force finds the weak point, usually a mortar joint, a block seam, or the base of the footing.
This is why a wall that looked fine in June can start bulging by October. Retaining wall bulging almost always traces back to water that had nowhere to go. Once you see a wall bowing outward, tilting, or cracking horizontally, you’re looking at retaining wall failure signs that need immediate attention, not a wait-and-see approach.
Not every wall needs the same level of drainage effort. A few site conditions push a project from “basic weep holes” to “full pipe and gravel system”:
- Wall height. Walls under 3 feet with sandy, well-draining soil often get by with weep holes alone. Anything approaching or exceeding 4 feet needs a proper drain pipe system.
- Soil type. Clay and heavy loam hold water and drain slowly, which raises hydrostatic pressure fast. Sandy or gravelly native soil drains on its own and reduces the load.
- Uphill runoff. If your wall sits at the base of a slope that collects water from a larger area, you’re managing more volume than the wall’s footprint suggests.
- Nearby impervious surfaces. Driveways, patios, and roofs that shed water toward the wall add volume the drainage system has to handle.
- Downspouts. A gutter downspout dumping directly behind a wall is one of the most common, and most fixable, causes of chronic wet spots and staining.
The rule of thumb worth remembering: short walls in sandy, well-draining yards with no nearby runoff sources can often rely on weep holes alone. Anything taller, on clay, or collecting concentrated water needs the full pipe-and-gravel treatment. Site conditions genuinely determine the need, and this is exactly the kind of judgment call where a professional engineer’s opinion, or a contractor with years of local soil experience, saves you from guessing wrong on a wall you can’t easily fix later.
The Core Parts of Every Drainage System
A well-drained retaining wall is really just four components working together. Skip one, and the whole system underperforms even if the other three are done right.
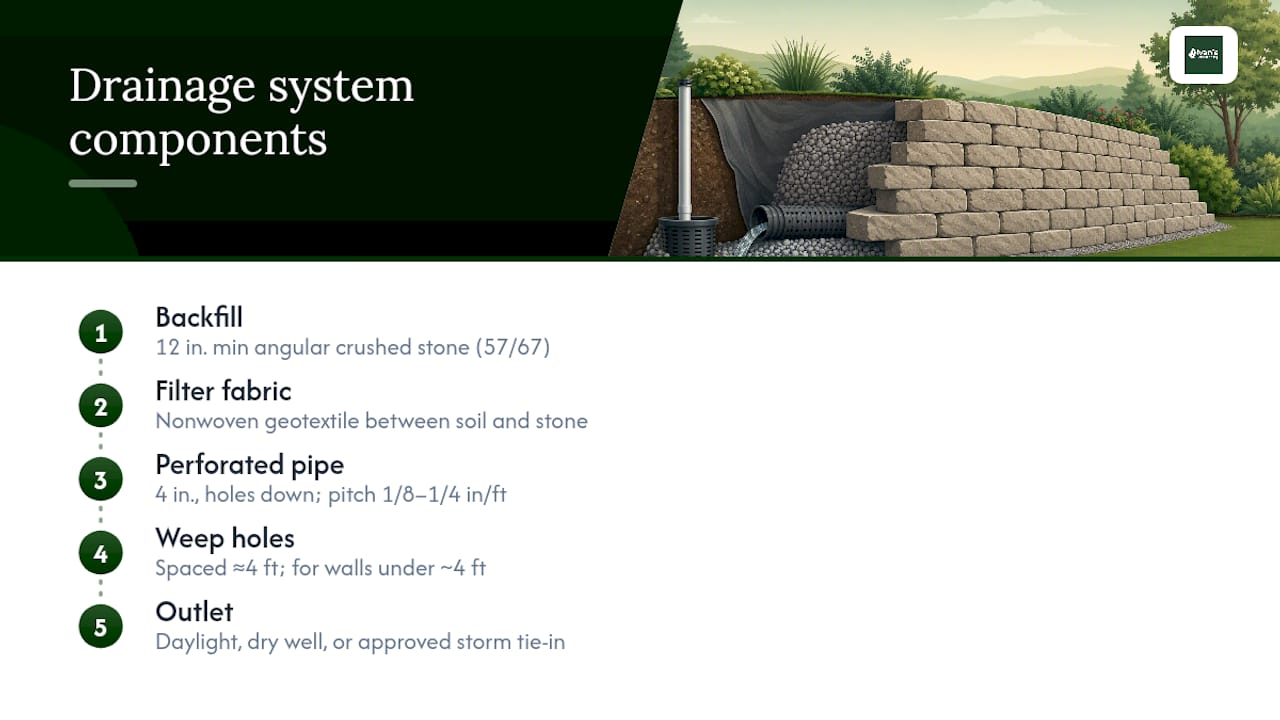
Backfill: 12 inches of clean stone, minimum. Trade guides consistently call for at least 12 inches of clean, angular crushed stone, usually graded as 57 or 67 stone, directly behind the wall. The angular shape matters. Rounded pea gravel packs together and loses void space over time, while angular stone locks in place and keeps open channels for water to move through. Some contractors go deeper, 18 to 24 inches, when budget allows, because more stone means more void space and more margin for error as soil settles over the years.
Filter fabric: the barrier that keeps stone clean. Nonwoven geotextile fabric goes between the native soil and the clean stone backfill. Without it, fine soil particles migrate into the stone over a few seasons and clog the very void space you just paid for. This single yard of fabric is cheap insurance against a system that quietly stops working five years down the road.
Perforated pipe: 4 inches, holes down, pitched to daylight. A 4-inch perforated pipe laid at the base of the backfill zone carries water away faster than gravel alone. Installation guides are specific here: orient the perforations downward so sediment falls away from the holes instead of into them, bed the pipe in washed crushed stone, and pitch it toward the outlet at roughly 1/8 to 1/4 inch of fall per foot.
Weep holes: relief for shorter walls. For walls under about 4 feet, weep holes spaced roughly every 4 feet along the base give trapped water a direct exit through the wall face. Taller walls typically need both weep holes and a full pipe system working together.
Outlets: the part people forget. Every one of these systems is useless if the pipe doesn’t discharge somewhere. Your options are daylighting to a lower point on the property, running to a dry well, or, where local code allows, tying into a storm system. Manufacturer installation manuals for block wall systems are blunt about this: place the drain tile as low as practically possible so gravity does the work, and always give it somewhere to go.
Materials, Tools, and Sizing for Your Project
Buying the right materials in the right quantities keeps a drainage retrofit or new build from turning into three trips to the supply yard.
Materials to buy:
- 57 or 67 crushed stone for backfill, sold by the ton at most landscape supply yards.
- 4-inch perforated PVC or corrugated HDPE pipe, either works, though rigid PVC holds its shape better under compaction from foot traffic and equipment.
- Nonwoven geotextile filter fabric, sold in rolls, wide enough to wrap fully around the stone envelope.
- Washed stone specifically for bedding the pipe itself, kept separate from general backfill stone if your supplier distinguishes the two.
For sizing, figure roughly 12 inches of stone depth across the width of your backfill zone (typically 12 to 18 inches wide) for every linear foot of wall. A rough tonnage estimate: one ton of crushed stone covers about 15 to 20 square feet at a 12-inch depth, so a 30-foot wall with a 12-inch backfill width needs somewhere around 2 tons, though your supplier can refine that based on their stone’s exact density.
Tools you’ll want on hand or rented:
- A square-point shovel and mattock for trenching along the wall base.
- A hand tamper or rented plate compactor for settling stone in lifts.
- A hammer drill with a masonry bit if you’re retrofitting weep holes into an existing block or poured wall.
- A mini excavator or rented trencher for anything longer than about 20 feet, since hand-digging a proper drainage trench that length is brutal work.
Pro Tip: Call your local utility locator service before any excavation, even for a shallow trench. It’s free, it takes a day or two to get marked out, and it’s far cheaper than hitting a gas or electric line behind your own retaining wall.
Check your local code before connecting any outlet pipe to a municipal storm system. Some jurisdictions require a permit for grading and drainage work, particularly on walls over a certain height, so a quick call to your building department before you dig saves headaches later.
How to Install Drainage Behind a New Retaining Wall
Building drainage into a new wall from the start is far easier than retrofitting one later, because you have full access to the excavation before any block or stone goes in permanently. The sequence runs from the base up: dig, place stone, lay pipe, wrap fabric, backfill, connect the outlet, and finish the surface.
-
Excavate to the proper depth. Dig your trench and backfill zone deep enough to accommodate your base stone, wall footing, and the full 12-inch minimum backfill width behind the wall face. Most residential walls need 18 to 24 inches of total excavation depth once you account for the footing.
-
Lay and compact the base stone. Spread 4 to 6 inches of compactable base stone (a different, denser material than your drainage backfill) beneath the wall footing itself, then tamp it in 2-inch lifts. This gives the wall a stable, well-drained foundation before drainage even enters the picture.
-
Place the perforated pipe. Set your 4-inch perforated pipe at the base of the drainage zone, holes facing down, resting in a bed of washed crushed stone at least a few inches deep on all sides. Keep the pipe as low as the design allows, since manufacturer guides consistently recommend placing drain tile as low as possible behind the wall.
-
Pitch the pipe toward the outlet. Set the pipe at a consistent slope of 1/8 to 1/4 inch of fall per linear foot, running continuously toward your chosen outlet point. A string line and level make this far easier to check than eyeballing it.
-
Wrap the drainage zone in filter fabric. Line the excavation against the native soil with nonwoven geotextile fabric before you start backfilling with stone, and fold the fabric over the top of the stone once you’ve filled to grade. This wraps the entire stone and pipe assembly in a barrier that keeps soil particles out permanently.
-
Backfill with clean stone in lifts. Fill the drainage zone with your 57 or 67 stone in 6 to 8 inch lifts, lightly tamping each lift as you go. Avoid the temptation to dump it all in at once. Compacting in stages keeps the stone from settling unevenly later and creating a low spot that traps water.
-
Connect and test the outlet. Run the pipe to daylight at a lower point on the property, into a dry well, or to a code-approved storm connection. Before you finish backfilling completely, run a hose into the pipe from the high end and confirm water exits cleanly at the outlet. This is the one-step people skip and regret, because catching a blockage or a low spot now takes ten minutes. Finding it after the wall is finished means digging it back up.
-
Finish the surface. Cap the last few inches with topsoil or sod so the drainage stone stays hidden beneath a clean, finished grade.
A few situations call for stopping and getting professional engineering sign-off before you proceed past the excavation stage:
- The wall exceeds roughly 4 feet in height, measured from the base of the footing to the top of the wall.
- Soil testing or a probe reveals heavy clay that drains poorly even with a full stone and pipe system.
- The wall will support a surcharge load, meaning a driveway, patio, deck, or any structure sits on the soil directly behind it.
Getting this checked before you build costs a few hundred dollars for an engineer’s review. Getting it wrong costs a rebuilt wall.
Retrofitting Drainage Into an Existing Retaining Wall
Not every drainage problem requires tearing out a wall you already built or inherited. The right fix depends on how bad the problem actually is, and a short assessment tells you which category you’re in.
Start with a visual check: look for staining, efflorescence (the white chalky mineral deposit left by evaporating water), visible bulging, or cracks running horizontally across the wall face. Push a soil probe or long screwdriver into the ground a foot or two behind the wall after a dry spell. If it sinks in easily, you’re dealing with saturated, poorly draining soil even without rain that day. Also consider your access. Can you reach the back of the wall without major excavation, or is it buried under an established garden bed or patio?
DIY-friendly fixes work for walls showing early or mild symptoms:
- Drill or clear weep holes. If your wall already has weep holes that are clogged with soil or debris, clearing them with a long drill bit or wire brush often restores drainage immediately. If it has none, a hammer drill can add 2 to 4 inch weep holes at the base, spaced every 4 feet.
- Install a shallow French drain. Digging a narrow trench a foot or two behind the wall, lining it with fabric and gravel, and running a small perforated pipe to daylight intercepts water before it ever reaches the wall’s backfill zone.
- Redirect downspouts and surface runoff. Extending a downspout away from the wall or regrading a shallow swale to divert surface water solves a surprising number of drainage problems without touching the wall at all.
The invasive retrofit, full excavation to install proper pipe and clean stone behind an existing wall, is a bigger job. It means digging down along the entire wall length, which risks undermining the wall’s own footing if done carelessly, especially on taller or older walls where the soil has settled and compacted against the back face over years. DIY works fine for the lighter fixes, but a full pipe retrofit on anything beyond a short garden wall is contractor-level work.
Pro Tip: If you see the wall itself moving, not just water stains but actual outward lean or a fresh crack that wasn’t there last season, stop trying to fix drainage and call a professional first. Drainage work on a structurally compromised wall can accelerate the failure you’re trying to prevent.
Common Drainage Mistakes and a Maintenance Checklist
Most retaining wall drainage failures come down to a short list of repeated errors, not bad luck or unusual weather.
- Backfilling with native clay or crusher-run instead of clean stone. Crusher-run and clay both compact tight and trap water instead of letting it pass through, which defeats the entire purpose of the system.
- Skipping the filter fabric. Saves maybe $30 on a typical residential job, then costs the whole system’s function five years later when fine soil clogs the stone.
- Burying the outlet. A pipe that ends underground with nowhere to discharge is just an expensive way to move water from one buried spot to another.
- Insufficient stone depth. Anything less than the 12-inch minimum leaves too little void space to handle real storm volume.
- Wrong pipe orientation or no pitch at all. A flat or reverse-sloped pipe collects standing water and sediment instead of moving it along.
Statistic Callout: A wall built with proper 12-inch stone backfill and a pitched drain pipe handles storm runoff for decades with minimal intervention, while walls backfilled with native clay commonly show bulging or cracking within just a few wet seasons.
A short seasonal maintenance routine catches problems while they’re still cheap to fix:
- Walk the wall after any heavy storm and check that the outlet is actively discharging water, not just sitting dry when it should be flowing.
- Clear weep holes of leaves, mulch, and debris at least once each spring and fall.
- Confirm the daylighted outlet point hasn’t been buried by mulch, sod growth, or a new landscaping bed.
- Look for efflorescence or new staining on the wall face, both early signs of water working through the system.
- Note any new lean, bulge, or crack, however small, and compare it to a photo from the season before.
Most issues you’ll catch this way are quick fixes: clearing a weep hole, extending a downspout, or clearing a partially blocked outlet. If you’re seeing repeated bulging, a widening crack, or standing water that won’t clear within a day of a storm ending, that’s the signal to bring in an engineer or contractor rather than keep patching the surface.
Field Notes From Ivan’s Landscaping
A local landscaping company has been building and repairing retaining walls in McHenry County, Illinois for many years, with drainage and grading work as a significant part of their services. The patterns hold true on almost every property: walls fail at the point where someone skipped stone depth or ignored a downspout dumping straight into the backfill zone.
A few field-tested habits worth borrowing: clear the work area of mulch, sod, and old edging before excavation starts, since half the labor on a retrofit is often just accessing the wall. Budget more time than you think you’ll need. Even a straightforward 20-foot wall drainage retrofit routinely runs two full days once you account for utility locates, excavation, and compaction in proper lifts. And plan the outlet destination before you dig a single shovel of dirt. It’s the detail every rushed job gets wrong first.
How to Inspect and Monitor Your Drainage System Over Time
A retaining wall’s drainage system doesn’t announce its own failure until the wall itself starts moving, so periodic checks matter more than most homeowners assume. The most useful inspection window is right after a heavy rain, when you can actually watch the system work, or fail, in real time.
Walk the base of the wall during or immediately after a storm and look at the outlet point directly. Water should be flowing, even if it’s a modest trickle. No flow at all after a hard rain usually means a clog somewhere in the pipe run or a crushed section from settling soil above it. Check weep holes the same way. Water dribbling from each one is normal and healthy. Water pooling at the base of the wall instead of exiting through the holes points to a blockage.
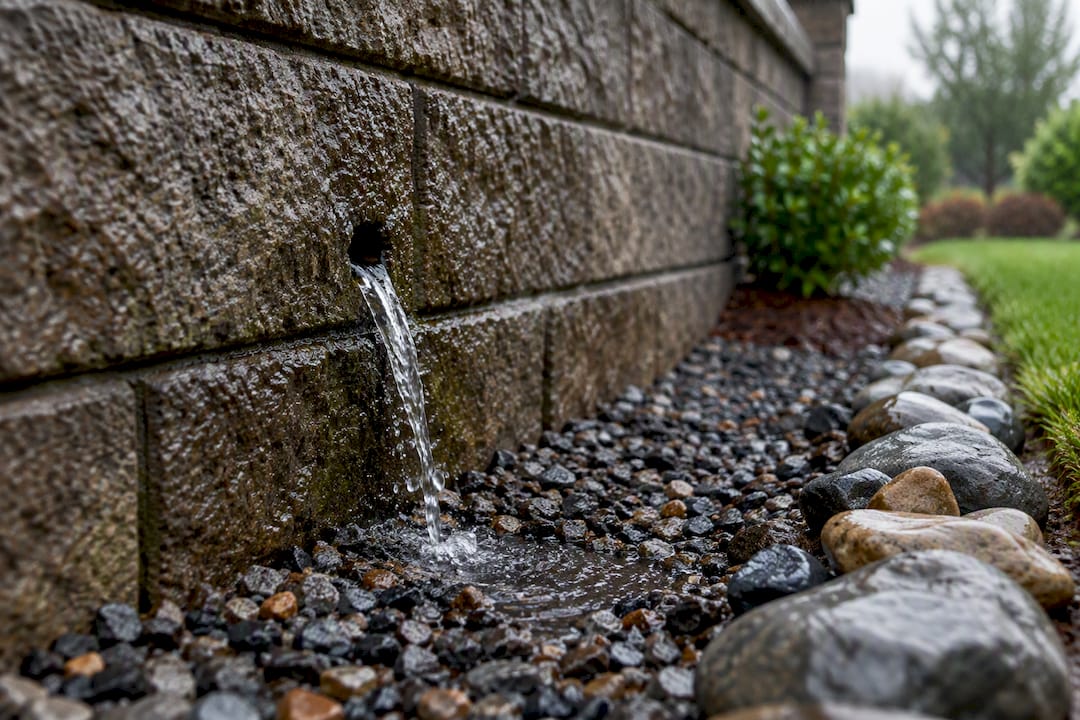
Between storms, look for the slower warning signs: efflorescence streaking down the wall face, moss or algae growth concentrated in one spot (a sign of a chronic wet zone), or soil settling unevenly along the top of the backfill area, which suggests the stone below has shifted or lost void space. A soil probe pushed into the ground a few feet behind the wall a day or two after rain tells you how well the backfill is actually draining compared to the surrounding yard.
Keep a simple record. A phone photo of the wall face and outlet twice a year, spring and fall, makes it far easier to spot a slow-developing bulge or a new crack than relying on memory. Small changes are easy to catch early and cheap to fix. The same changes, ignored for two or three years, usually mean full excavation.
How Rainfall Patterns and Climate Shape Your Drainage Design
The amount and pattern of rainfall your property sees should directly influence how much drainage capacity you build in, not just whether you build any at all. A region with frequent, moderate rain spread across the year puts steadier, more predictable pressure on a drainage system than one with occasional intense downpours.
If your area sees short, heavy storm bursts, sizing matters more than usual. A system built to the bare 12-inch minimum stone depth may handle routine rain fine but get overwhelmed during a fast, intense storm that dumps several inches in an hour. In that scenario, the deeper 18 to 24 inch stone zone that some contractors favor as extra margin stops being a luxury and starts being the difference between a wall that handles the storm and one that doesn’t.
Freeze-thaw cycles add another layer. In climates with real winters, water trapped in backfill that freezes expands and adds mechanical stress to the wall on top of hydrostatic pressure. This is part of why drainage stone needs to stay clean and free-draining year-round. A system clogged with fine sediment by autumn is far more vulnerable to frost heave than one still moving water freely.
Snow melt deserves specific attention if you’re in a region that gets meaningful snowpack. A slow, steady melt over weeks behaves very differently than a sudden warm spell that melts everything at once and sends a surge of water toward your wall’s backfill zone. If your wall sits below a slope that holds snow through winter, plan drainage capacity around that spring surge, not just summer thunderstorms.
Why Drainage and Wall Structure Have to Be Designed Together
Drainage isn’t an accessory bolted onto a finished retaining wall. It’s part of the structural design, and treating it as an afterthought is exactly how walls that looked structurally sound on paper end up bulging within a couple of seasons.
Every retaining wall design calculation accounts for the soil load pushing against the wall face. That calculation assumes a certain soil weight and pressure, and that assumption only holds if drainage is actually removing water the way it’s supposed to. Add unmanaged hydrostatic pressure on top of the soil load the wall was engineered to handle, and you’ve quietly changed the structural math without anyone recalculating it.
This is why the footing, the wall’s base and depth, gets designed with drainage in mind from the start. A wall built without accounting for drainage may need a wider or deeper footing than one where drainage is properly integrated, because the undrained design has to resist more total force. It’s also why the backfill zone width, typically 12 to 18 inches, isn’t arbitrary. It reflects the space needed for stone, fabric, and pipe to function as a system, not just a buffer of loose material.
Walls that carry a surcharge load, meaning something sits on the soil directly behind them like a patio, driveway, or deck, need this integration even more carefully. The surcharge adds weight on top of the soil’s own weight, and drainage has to be sized to handle water moving through that combined load. This is precisely the kind of calculation where a stamped engineering review, not a general contractor’s estimate, protects you if the wall ever needs to be defended in a permit dispute or insurance claim.
Managing Erosion and Sediment Around Your Retaining Wall
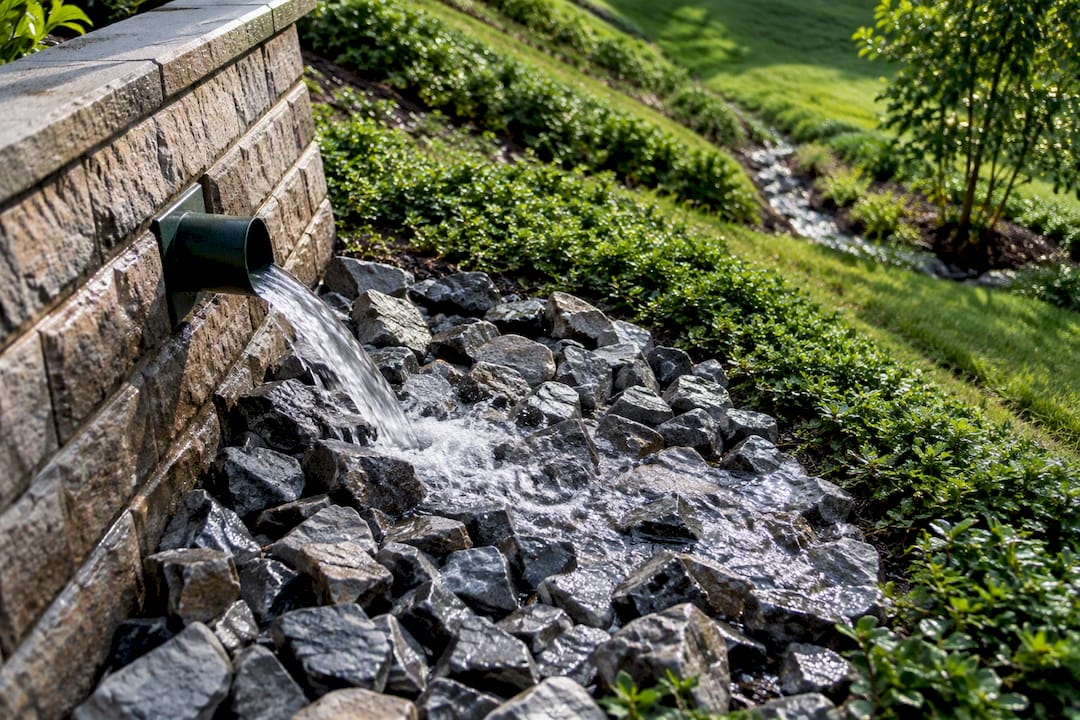
A retaining wall’s job includes controlling erosion, but the drainage system built to protect the wall can itself become an erosion source if the outlet isn’t handled thoughtfully. Water exiting a 4-inch pipe at full flow during a storm carries real force, and if it discharges onto bare soil, it can carve a channel or wash out plantings within a single season.
Daylighting an outlet onto a splash pad of rock, or directing it into an existing swale with established groundcover, spreads that energy out instead of concentrating it in one erosive stream. This matters more on sloped properties, where water exiting a wall’s drainage system has gravity working in its favor the whole way down the hill.
Sediment management runs the other direction: keeping soil out of the system rather than managing water once it’s inside it. Filter fabric is the primary defense, but surface grading around the top of the wall matters too. If runoff from an adjacent slope carries loose topsoil down toward the wall’s backfill zone every time it rains, that sediment eventually finds its way past even well-installed fabric at seams or overlaps. A simple grass buffer strip or a shallow swale above the wall intercepts that sediment before it becomes the drainage system’s problem.
For properties near any wetland, stream, or drainage easement, check whether local regulations require erosion control measures like silt fencing during construction. Many municipalities in Illinois and elsewhere require this for grading work above a certain disturbed area, and it’s a cheap safeguard against sediment runoff reaching a storm system or waterway during the excavation phase itself.
When to Handle It Yourself and When to Call a Pro
Clearing weep holes, rerouting a downspout, or digging a shallow surface French drain are reasonable DIY projects for most homeowners with basic tools and a weekend. Full pipe retrofits behind an existing wall, and any engineered retaining wall design, sit in contractor territory. Three signals mean it’s time to call a professional: visible structural movement in the wall itself, a wall height approaching or exceeding 4 feet, or a drainage problem complicated by high water table or unusually poor soil. Whoever you hire, insist on a written scope and estimate before work starts. It protects both of you.
— Chas
How Ivan’s Landscaping Handles Drainage and Retaining Wall Projects
If the assessment above points toward hiring a professional, Ivan’s Landscaping has built and repaired retaining walls throughout McHenry County since 2008, and drainage and grading work is one of the services we handle regularly alongside paver patio installation for properties that combine hardscape and wall projects in one scope. Estimates typically start with an on-site assessment of soil, slope, and existing drainage before recommending an approach, supported by a satisfaction guarantee and a commitment to leaving properties clean upon completion.
If you’re seeing bulging, standing water, or you simply want a professional opinion before you dig, request a free estimate through our drainage and grading services page and we’ll schedule a site visit to walk the property with you.
Sources
- Retaining Wall Drainage: What Is It and Why Does It Matter? | The Family Handyman
- Retaining wall drainage guidance | The Spruce
- Retaining Wall Drainage: Weep Holes, Drain Pipes, and Installation Steps
- Water management | Allan Block residential installation
FAQ
What Is the Best Drainage Behind a Retaining Wall?
The best setup combines at least 12 inches of clean, angular 57 or 67 stone backfill with nonwoven filter fabric and a 4-inch perforated pipe pitched to a working outlet. Weep holes provide backup relief on shorter walls, but the stone-and-pipe combination is what actually moves water away before it builds pressure.
Does a 2-Foot Retaining Wall Need Drainage?
A wall around 2 feet tall usually gets by with weep holes alone if the soil drains well and there’s no concentrated runoff nearby, since full pipe systems typically become necessary around 4 feet. Clay soil or nearby downspouts change that calculation even on a short wall, so check site conditions before skipping drainage entirely.
What Is the 1/3 Rule for Retaining Walls?
The 1/3 rule is a rough design guideline stating that a wall’s base or footing width should be roughly one third of its total height to resist overturning and sliding forces. It’s a simplified starting point, not an engineering calculation, and taller or load-bearing walls need a proper structural review rather than relying on this rule alone.
What Are Common Retaining Wall Drainage Mistakes?
The most frequent mistakes are backfilling with native clay instead of clean stone, skipping the filter fabric, and burying the outlet pipe so it has nowhere to discharge. Wrong pipe orientation or a pipe with no pitch toward the outlet also shows up constantly in walls that fail within a few wet seasons.
Can I Retrofit Drainage Into a Wall That’s Already Built?
Yes, though the approach depends on severity. Clearing or drilling weep holes and adding a shallow French drain work well as DIY fixes for mild issues, while a full pipe-and-stone retrofit requiring excavation along the wall’s back face is generally contractor-level work due to the risk of undermining the footing.